- 공유 링크 만들기
- X
- 이메일
- 기타 앱
[Docker]Docker를 이용하여 웹 서버 구축 - 응용편(2)
이번에는 컨테이너끼리 연결하는 방법을 포스팅할 예정이다.
환경


- node.js
- mysql
- AWS EC2(amazon OS)
개요
- node.js설치
- 도커 이미지 생성
- mysql이미지 다운
- mysql 컨테이너 실행
- node.js 컨테이너로 mysql 컨테이너에 연결
- mysql연결 확인
- test페이지 작성 및 DB연결 테스트
node.js설치
- ubuntu에 node.js설치
$ sudo docker pull ubuntuUsing default tag: latest latest: Pulling from library/ubuntu e20a84c3233b: Pull complete d6c64ee0ce32: Pull complete d8d3e3b9a2f4: Pull complete ce76de2e871b: Pull complete Digest: sha256:-- Status: Downloaded newer image for ubuntu:latest이미지 확인
$ sudo docker imagesREPOSITORY TAG IMAGE ID CREATED VIRTUAL SIZE ubuntu latest ce76de2e871b 3 days ago 187.9 MB컨테이너 생성 및 접속
$ sudo docker run -i -t ubuntu:latest /bin/bash~/# apt-get update
~/# apt-get install -y curl
~/# curl -sL https://deb.nodesource.com/setup_5.x | sudo -E bash -
~/# apt-get install -y build-essential libssl-dev환경 변수가 재 설정되므로 다시 로그인 해준다.
~/# exit$ sudo docker ps -aCONTAINER ID IMAGE COMMAND CREATED STATUS PORTS NAMES 93cf864722c3 ubuntu:latest "/bin/bash" 27 minutes ago Exited (0) 12 seconds ago lonely_carson컨테이너가 종료되어 있으므로 실행
$ sudo docker start lonely_carson컨테이너에 재 접속
$ sudo docker attach lonely_carsonnode.js버전 확인
~/# node -vv5.7.0npm을 이용하여 express설치
~/# cd /svr
~/# npm install -g express-generatorexpress를 이용하여 테스트 프로젝트 생성 및 실행 확인
~/# express —ejs example01
~/# cd exsample01
~/# npm install
~/# node bin/www
[Ctrl]+[c]
~/# rm -rf example01
~/# exit이것으로 도커 이미지를 만들기 위한 준비는 되었다.
도커 이미지 생성
컨테이너 확인
$ sudo docker ps -a
qCONTAINER ID IMAGE COMMAND CREATED STATUS PORTS NAMES 93cf864722c3 ubuntu:latest "/bin/bash" 36 minutes ago Exited (130) 9 seconds ago lonely_carson이미지 생성
$ sudo docker commit lonely_carson ubunbu-nodejs:nodejs이미지 확인
$ sudo docker imagesREPOSITORY TAG IMAGE ID CREATED VIRTUAL SIZE ubunbu-nodejs nodejs ad253d6c4583 About a minute ago 396.6 MB
Mysql 이미지 다운로드
- mysql 이미지 검색
$ sudo docker search mysqlNAME DESCRIPTION STARS OFFICIAL AUTOMATED mysql MySQL is a widely used, open-source relati... 1839 [OK] mysql/mysql-server Optimized MySQL Server Docker images. Crea... 107 [OK] centurylink/mysql Image containing mysql. Optimized to be li... 38 [OK] sameersbn/mysql 31 [OK] google/mysql MySQL server for Google Compute Engine 14 [OK] appcontainers/mysql Centos/Debian/Ubuntu Based Customizable My... 7 [OK] . . .
- mysql 이미지 다운로드
$ sudo docker pull mysql:latestlatest: Pulling from library/mysql 077420be376c: Pull complete 4ccc44ce8a54: Pull complete 2b650acda9c9: Pull complete 4bf729879498: Pull complete 74ed6f421f3f: Pull complete be67940d8706: Pull complete 7020fa944237: Pull complete d18d6899b7ef: Pull complete 5d07762772f4: Pull complete 755dbdf60599: Pull complete 4102ac5c18f9: Pull complete 4e0aacde4bdd: Pull complete 87c87999729e: Pull complete 9ece564cf894: Pull complete Digest: sha256:-- Status: Downloaded newer image for mysql:latest$ sudo docker imagesREPOSITORY TAG IMAGE ID CREATED VIRTUAL SIZE ubuntu-nodejs nodejs ad253d6c4583 4 minutes ago 396.6 MB mysql latest 9ece564cf894 13 days ago 361.2 MB
mysql 실행(컨테이너 생성)
- mysql 데몬으로 실행 및 컨테이너 생성
$ sudo docker run -d —name db01 -e MYSQL_ROOT_PASSWORD=[password] mysql$ sudo docker psCONTAINER ID IMAGE COMMAND CREATED STATUS PORTS NAMES 47155a22c838 mysql "/entrypoint.sh mysql" 6 seconds ago Up 5 seconds 3306/tcp db01
node.js 실행(컨테이너 생성)
- node.js 실행 및 컨테이너 생성
- 웹 서버쪽에서 연결하고 싶은 mysql서버에 링크를 건다.
$ sudo docker run —name web01 -d -p 8010:3000 -v /srv:/srv —link db01:db01 ubuntu-nodejs:nodejs
실행 중인 컨테이너 확인
$ sudo docker psCONTAINER ID IMAGE COMMAND CREATED STATUS PORTS NAMES 48b99986459b mysql "/entrypoint.sh mysql" 13 minutes ago Up 13 minutes 3306/tcp db01컨테이너가 실행되어 있지 않다면 web01을 삭제
$ sudo docker rm web01다른 방법으로 실행
$ sudo docker run —name web01 -i -t -p 8010:3000 -v /srv:/srv —link db01:db01 ubuntu-nodejs:nodejs /bin/bash컨테이너에서 나오기
~/# [Ctrl]+[p]와 [Ctrl]+[q]다시 실행 중인 컨테이너 확인
$ sudo docker psCONTAINER ID IMAGE COMMAND CREATED STATUS PORTS NAMES 9d1deabad7f6 ubunbu-nodejs:nodejs "/bin/bash" 5 minutes ago Up 5 minutes 0.0.0.0:8010->3000/tcp web01 48b99986459b mysql "/entrypoint.sh mysql" 13 minutes ago Up 13 minutes 3306/tcp db01컨테이너의 링크가 제대로 걸려 있는지 확인
$ sudo docker inspect —format “{{.HostConfig.Links}}” web01[/db01:/web01/db01]위와 같은 결과가 출력되면 링크가 정상적으로 실행된 것이다.
즉, 컨테이너끼리 통신이 가능하다는 것이다.
web01 -> db01 mysql 연결 확인
web01컨테이너에 접속
$ sudo docker attach web01mysql접속 확인
~/# mysql -uroot -p -hdb01bash: mysql: command not foundmysql을 설치하지 않아서 발생하는 에러이므로 mysql설치
~/# apt-get install mysql-client
~/# mysql -uroot -p -hdb01Welcome to the MySQL monitor. Commands end with ; or \g. Your MySQL connection id is 13 Server version: 5.7.11 MySQL Community Server (GPL) Copyright (c) 2000, 2015, Oracle and/or its affiliates. All rights reserved. Oracle is a registered trademark of Oracle Corporation and/or its affiliates. Other names may be trademarks of their respective owners. Type 'help;' or '\h' for help. Type '\c' to clear the current input statement. mysql>mysql에 정상적으로 접속이 된 것을 확인 할 수 있다.
Test페이지 작성 및 DB연결
먼저 DB접속 테스트를 위해 테스트용 DB와 테이블을 생성
먼저 DB접속 테스트를 위해 테스트용 DB와 테이블을 생성
mysql> create database example01;
mysql> use example01;
mysql> create table test01(printtext varchar(100) primary key) ENGINE=InnoDB;
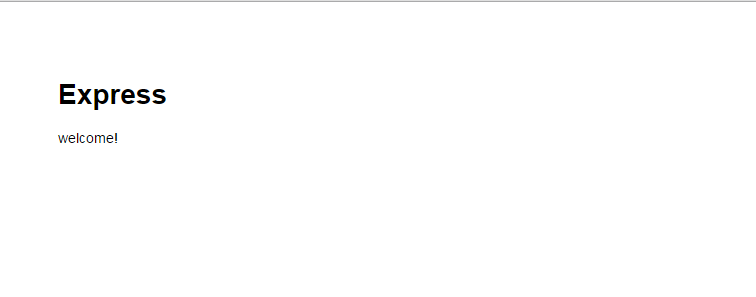
mysql> insert into test01 value(“welcome!”);
mysql> select * from test01;+-----------+ | printtext | +-----------+ | welcome! | +-----------+mysql> exit;test페이지는 node.js의 express를 이용할 예정이다.
~/# cd /srv
~/srv# express —ejs example01
~/srv# cd example01
~/srv/example01# npm install
~/srv/example01# npm install -s mysql
~/srv/example01# cd routes
~/srv/example01/routes# vi index.jsvar express = require('express'); var router = express.Router(); /* GET home page. */ router.get('/', function(req, res, next) { res.render('index', { title: 'Express' }); }); module.exports = router;DB접속 및 테스트를 위해 소스 변경vim에디터가 잘 동작하지 않는다면 설치
~/srv/example01/routes# apt-get install -y vimvar express = require('express'); var router = express.Router(); var mysql=require('mysql'); var connection=mysql.createConnection({ host: 'db01', port: '3306', user: 'root', password: 'anrnDGhk82', database: 'example01' }); /* GET home page. */ router.get('/', function(req, res, next) { connection.query('select * from test01', function(err, rows, fields){ if (err) callback(err, null); console.log(rows[0].printtext); res.render('index', { title: 'Express', printtext: rows[0].printtext }); }); });index.ejs를 편집
~/srv/example01/routes# cd ../views/
~/srv/example01/views# vi index.ejs<!DOCTYPE html> <html> <head> <title><%= title %></title> <link rel='stylesheet' href='/stylesheets/style.css' /> </head> <body> <h1><%= title %></h1> <p>Welcome to <%= title %></p> </body> </html>소스를 수정<!DOCTYPE html> <html> <head> <title><%= title %></title> <link rel='stylesheet' href='/stylesheets/style.css' /> </head> <body> <h1><%= title %></h1> </h3><%= printtext %></h3> </body> </html>node.js실행
~/srv/example01/views# cd ..
~/srv/example01# nohup node bin/www &
~/srv/example01# exit;포트 리스닝 확인
$ netstat -an | grep 8010tcp 0 0 :::8010 :::* LISTENAWS의 Security Group에서 8010포트 추가 후 접속 확인
댓글
댓글 쓰기